A couple of months ago I talked about how I was working out my overnight basal rate to keep my blood sugars in check. How things have progressed!
Since then I have seen my endocrinologist and my HbA1c continues to rise (now at 6.8%). The overnight highs are now in check so it seems my mealtime spikes are now the problem, thus I have moved to both basal and bolus insulin.
Another development has been the subsidy of CGM (Dexcom) and Flash GM (Libre) for all people with Type 1 Diabetes in Australia. This means I now have access to a CGM at a heavily discounted price (a little over A$30 per month).
Finally, Insulet, the makers of the Omnipod insulin pump had a special deal to get a month’s supply of wearable pumps for A$30 instead of the usual A$400 or so.
Along with my mobile phone, this means I have everything I need to set up an Android APS loop i.e. I have the CGM and pump to talk to each other, rather than have me inject insulin multiple times per day. To this end I have been setting up Android APS on my phone and working my way through the mini-tutorials/objectives in the Android APS app. In literally three weeks I have gone from injecting my first meal bolus to having a Low Glucose suspend loop in place, but I digress…
Pump Values
A key part of setting up Android APS (and insulin pumps in general) is determining the values for your profile i.e. your basal rate, how you respond to carbohydrates, insulin, etc. In the case of Android APS, your profile needs:
- DIA: Duration of Insulin Action – This is a measure of how long insulin hangs around and acts on your glucose levels. It is measured in hours
- IC: Carbohydrate to Insulin ratio – This is a measure of how much insulin is needed to counteract a specific amount of carbohydrate, expressed as a ratio. The fraction is Carbohydrates (g) / Insulin (U). Generally in science such a ratio would be called a “CI ratio” but, for some reason, history has labelled this one IC
- ISF: Insulin Sensitivity Factor – This is a measure of your blood glucose level’s reaction to insulin, measured in U/(mmol/L, or whichever BGL units you prefer)
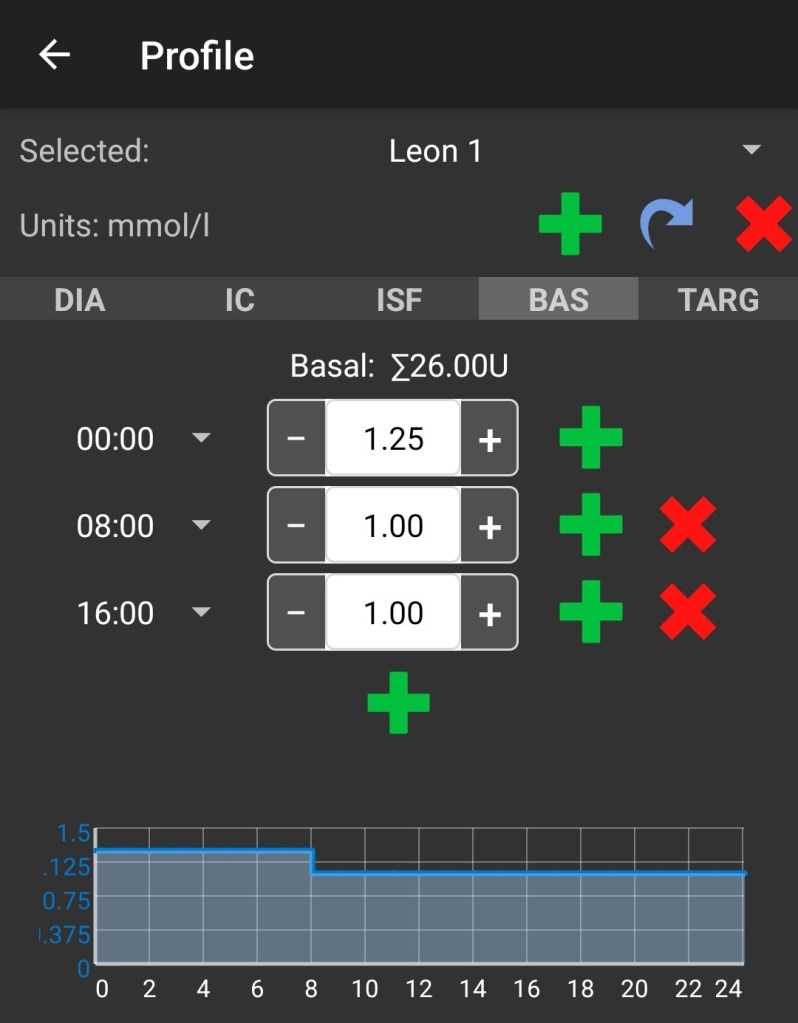
- BAS: Basal Rate – How much rapid acting insulin do you need to deliver to your body to keep your liver in check, measured in U/hour
- TARG: Target Glucose Level – What is your ideal default blood glucose level
All of these values are unique to the individual so how do we work them out?
Basal Rate (BAS)
For me, a good starting point was a direct conversion of my long acting insulin daily total to an hourly rate. So, overnight I was injecting 15U of Levemir and none in the day. Given my day rate was unknown, I used the same rate (pumps generally need a non-zero value) knowing this was likely a little too much and would need to be reduced. This was ok though because I now had a CGM on my arm (a Libre 2 which had been ‘encouraged’ to act as a CGM) and, if I was to go low, it was during waking hours and could be easily managed.
So 30U for the entire day divided by 24 hours is 1.25U/hr. This was my default rate.
To test whether the rate was accurate I split the day into three periods: 09:00-17:00, 17:00-01:00, and 01:00-09:00. Why these particular three periods? Because Android APS forces you to start the ranges at 00:00 and Novorapid (the insulin I am using in the pump) takes about an hour to get going. Also, they aligned nicely to human activity (working hours, evening hours, sleeping hours).
It was then a case of fasting and doing no boluses for a period (and trying not to do anything else to throw off my levels) and see if the line went up or down (allowing for a 10% margin of error on the reading).
As we can see above, while the rate stayed the same overnight, I did need to reduce it during the day as I kept creeping down over the eight hour periods. Generally I shifted the value in quarter unit increments but this will vary from person to person.
Your Basal Insulin Should Give You a Flat BGL!
I should make a point here because there seems to be a lot of confusion on it when I visit forums. If you do not eat, in the absence of other influences, your basal rate of insulin should give you a flat BGL line. If it is going up over time or going down it is not set correctly. Time and time again I hear stories of people missing a meal and going low (no pre-bolus) with an idea that this is the expected behaviour; that food is needed to ‘prop-up’ blood sugar levels.
If you regularly go low when missing a meal, and you have not pre-bolused, your basal rate is not set correctly. Without your basal rate set correctly, managing everything else becomes many times harder.
Here is an example I tweeted to illustrate the point.

This screenshot is in ‘Open Loop’ so Android APS is doing very little. Declarations of carbohydrate and insulin can be seen on the curve. Ignoring the spikes we can also see that the baseline is trailing downwards over the day, starting at 6mmol/L (108mg/dL) in the morning and hitting 4mmol/L (72mg/dL) just before dinner around 8pm.
So, at dinner, I have the conflict of combating my basal rate with carbs but also pre-bolusing for dinner. The result was the tripling of my blood glucose from 4mmol/L to 12mmol/L and a resulting rollercoaster. Not ideal. Doing eight hour fasts through the day, on different days, will give you a good idea on what your basal rate should be.
Insulin Sensitivity Factor (ISF)
The ideal time for me to test this was right at the end of the fast because it minimised confounding factors. The risk, of course, is that if you have been fasting, and your basal rate was too high, you may already be low and more insulin will give you a hypo. So you might want to do some tests when you are higher first to get a rough idea of your ISF value and then fine tune it after a fast with an amount of insulin which may send you lower but not dangerously so. So, for example, if you do some testing and conclude a unit of insulin lowers your blood glucose by 1-2 mmol/L, and you do not want to go below 4mmol/L, if, at the end of the fast your BGL is 6mmol/L then you could bolus 1U to see the reaction and be reasonably confident you will not go low.
For me, for the most part, this worked out fine. Only on one occasion did I go lower than expected and, in this case, I ended the test early and took a glucose tablet to halt the fall.
Carbohydrate to Insulin Ratio (IC)
It is really hard to measure this directly as it involves two inputs: Insulin and Carbohydrate, so I did not do it. Instead I measured how my BGL changed for a fixed amount of glucose e.g. a 4g glucose tablet, again generally at the end of a fasting period.
Measuring my Carbohydrate Sensitivity Factor (CSF) meant I could infer the IC because for a fixed change in BGL, we can use IC=CSF/ISF. For example, let us say my ISF is 2U/(mmol/L) i.e. 2U of insulin lowers my BGL by 1mmol/L, and I know 4g of carbohydrate raises my BGL by 1mmol/L. From this I can infer that my IC is 4/2 = 2 g/U.
A word of warning with this though, as it is the ratio of two variables, getting them both slightly wrong can have big consequences. So, for example, let us say my true ISF is 1U/(mmol/L) instead of 2 and my CGM was a little noisy making it hard to tell the difference, this has the effect of doubling my IC value (4/1 = 4). The solution is measure often and be conservative when changing values.
Target BGL (TARG)
This value is completely up to you but, my suggestion would be to keep it artificially high until the other factors are reasonably stable so you have ‘wiggle room’. I have started at 6mmol/L, will see how things go and probably bring it down as my confidence with the pump (and Android APS) grows. Some commercial looping systems put this closer to 7mmol/L (126mg/dL) and still get great results.
Duration of Insulin Action (DIA)
This is very hard to measure because insulins generally have a long tail and while, for one bolus this is not a big deal, with multiple there is the risk of insulin stacking and having a hypo. The complications involved in accurately measuring this are covered quite well here. My approach at this point is to try and tune the other factors as best as I can and then adjust this to see the effect. Based on advice from a veteran Android APS looper, I have set mine to 9 hours for now.
Shifting the Time Ranges of the Other Values
I mentioned above the ranges I set for the Basal Rates, but what do we do for the IC and ISF values we are measuring at the end of a Basal Rate period?
In my case I set new ranges where the end points of the fasting periods are in the middle of the ranges. Here, for example, are the ranges for my ISF values.

I may split these periods up in the future but this is how they are set now i.e. 04:00-12:00, 12:00-20:00, and 20:00-4:00.
Conclusions/What I Have Learned
While I could get an idea of my basal rate through incremental adjustments and finger-pricking, using a CGM and seeing how my BGL drifted over time made it much easier. It also allowed me to get an idea of my other pump settings which would be much harder with finger-pricking alone.
This is yet another reason why CGM technologies are so important for people with diabetes who are insulin dependent; it allows the person to see how they are tracking at a given moment in time but also over time which informs their overall management.
I also like this approach because it allows for on-going adjustment and the fasting periods can be set to suit my life, rather than the other way around; if I am working from home one day and no one else is around it is easy for me to skip lunch and test my basal, similarly for dinner.
If you have other techniques for working out your basal rates, feel free to add them to the comments and, remember, if your default blood glucose levels are not flat, fix your basal rates!
